An Easy and Simple Way to Make a Baby Rag Blanket
July 13th, 2012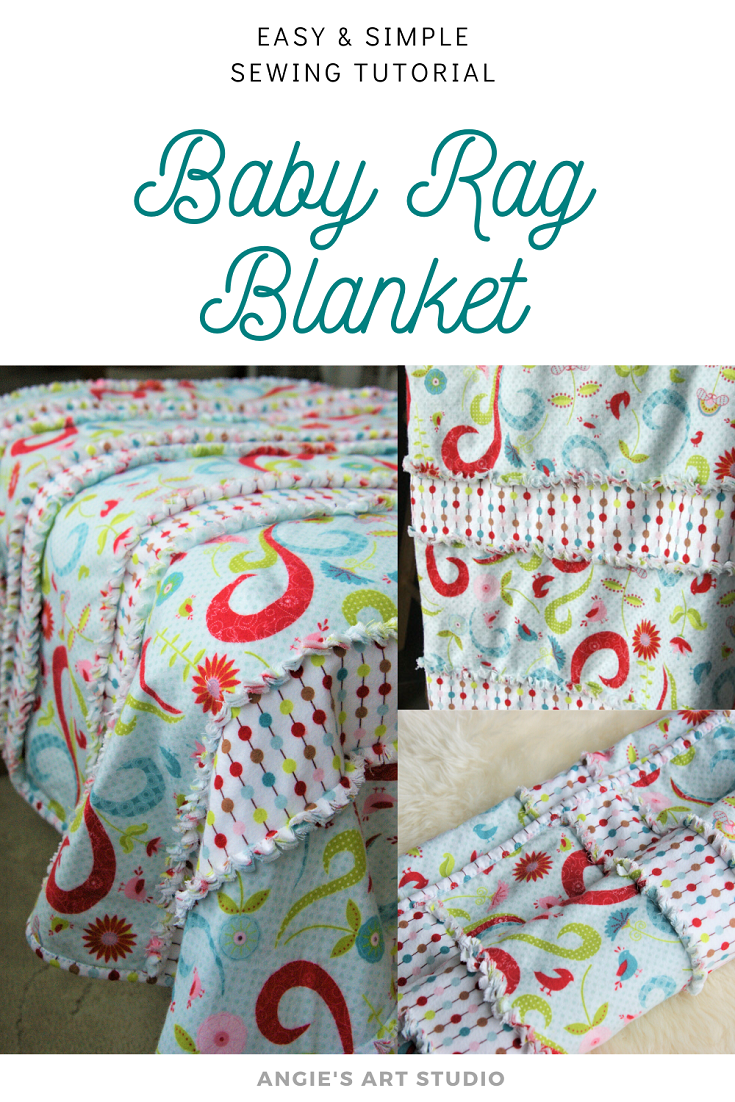
For a while now I have been admiring the raggy and fluffy edges of rag quilts, but most rag quilts I have seen on the internet are made with squares and the bulky, chunky look of them put a damper on my admiration.
And then I stumbled on a rag quilt that was made with strips which fired me up again. I really liked the clean and modern look of it with the right amount of fluffiness and raggedness. I also really liked that the outer edges had binding, framing the strips of raggy edges. The balance was just right for me so I had to try it out.
I call my version a blanket because there’s actually no quilting involved and I have modified the way most rag quilts are made so that it’s a super easy sewing project for a beginner. I think if you have a bit of sewing experience under your belt, like you already know how to make and attach binding, you could probably whip this up in a few hours.
Finished size is about 42″W x 48″H
It involves only 2 layers of flannel, no batting in between. You can certainly add more layers of flannel or fleece to make it thicker if you wish, but here in southern California, winters are mild so I like to make my blankets lighter in weight.
Materials List:
- 2 yards of good quality flannel fabric that doesn’t easily pill
- 1.75 yards of good quality flannel fabric in a different pattern
- scissors
- if you have it, spring-action handled scissors make it easier when it comes to clipping the edges (Fiskars Titanium Micro Tip Easy Action Scissors)
- quilting ruler
- rotary cutter (optional)
- chalk / fabric marker
- thread
- sewing machine
- walking foot (I actually didn’t use a walking foot when I made this blanket, but if you have one I highly recommend you use it when sewing on the binding, otherwise the binding will bunch up a bit.)
- pins
Baby Rag Blanket Tutorial:
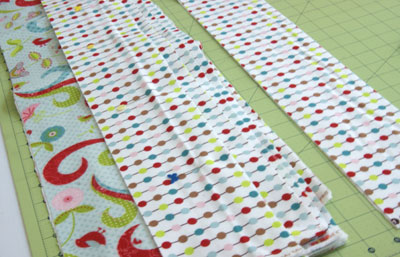
1. To cut your strips fold your fabric so that the selvages meet and are even.
2. You will be using the entire width of the fabric (44″) and doing some trimming later, there is no need to trim the selvages.
3. This is where a rotary cutter is handy but if you don’t have one, just measure and mark out the width of your strips with chalk or a fabric marker and cut with a pair of scissors.
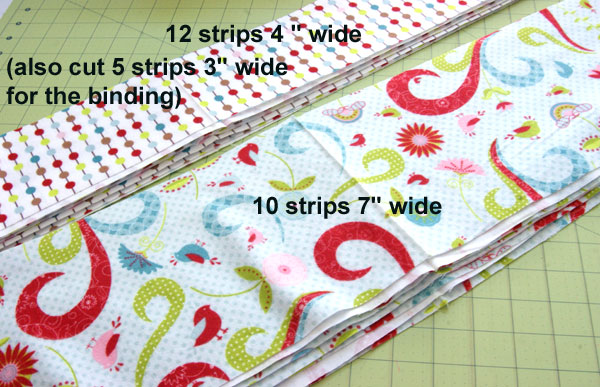
12 strips 4″ wide
10 strips 7″ wide
For the binding: 5 strips 3″ wide
4. You will be sewing with wrong sides facing together.
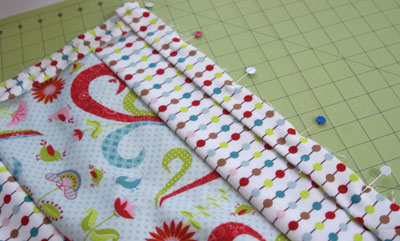
5. After you have finished cutting, stack the strips in pairs with wrong sides facing in and right sides facing out (pictured above).
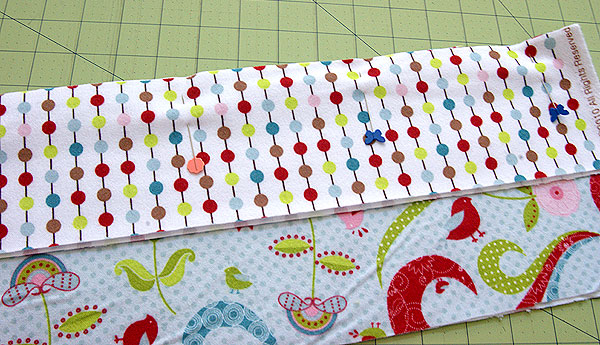
6. Place a pair of 4″ wide strips on top of the a pair of 7″ wide strips and pin together making sure the raw edges of the 4 layers are even.
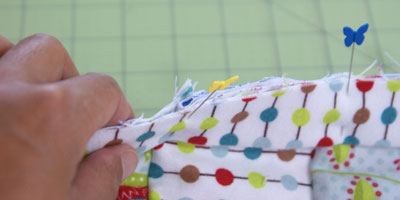
I also try to position the pins away from the fabric edge leaving enough space so that when I sew, the needle doesn’t hit the pins.
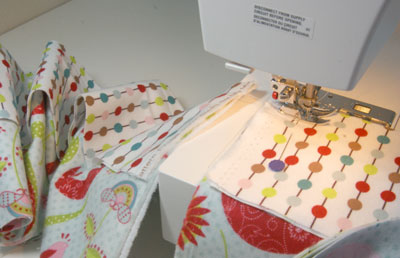
8. Sew 1/2 inch seam along the edge of all the fabric you have just pinned. You can do one continuous chain stitch without the need to backstitch at the beginning and end. This makes the sewing go really fast, especially if you have positioned your pins so that you don’t have to stop and start to take them out!
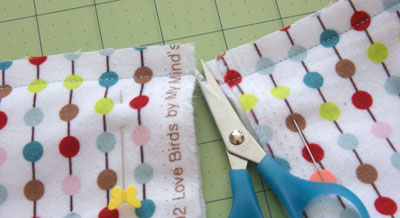
9. Snip the thread between each section.
10. Pin the remaining 4″ strip to a section that you have just sewed, making sure you are pinning it to the back (which is the side that is flat). Sew 1/2 inch seam.
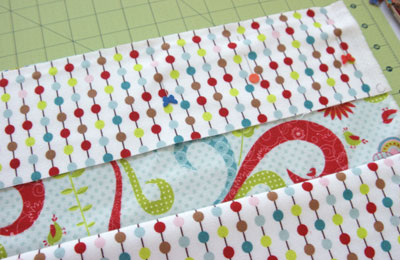
11. Lay out all your sections in the correct order so that you can pick up the fabric and then pin the sections together and sew again.
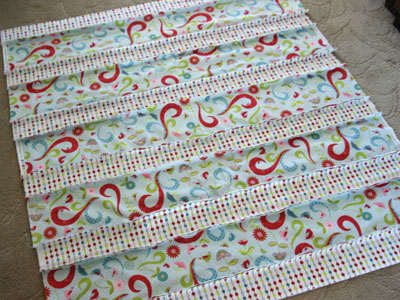
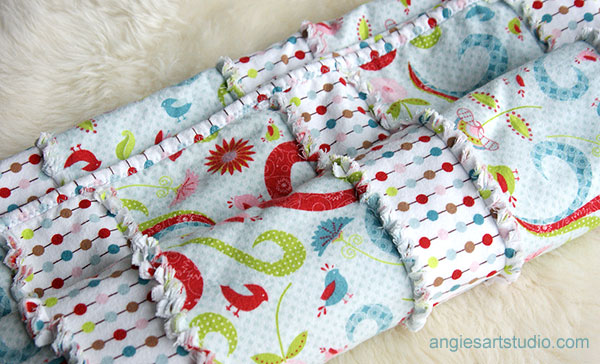
12. This is what it looks like after you have sewed all the strips together.
13. Square off the sides that are uneven.
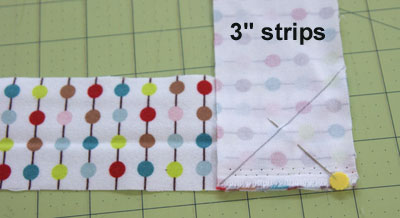
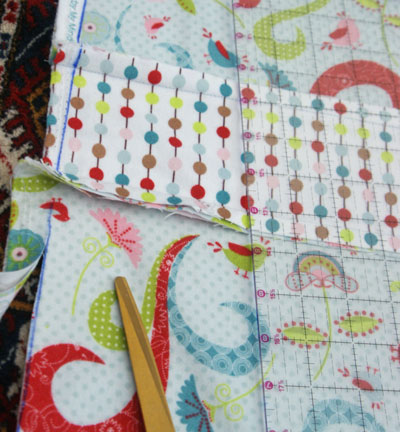
14. Grab your 3″ wide strips to make the binding. This is the tutorial I followed for the binding, it’s very good and easy to follow, just make sure your strips are 3″ and not 2.5″. It’s also where I got the idea to use a zig-zag stitch for attaching the binding – very cool because there’s no need to hand stitch AND it looks pretty decent!
I’m sorry if this is confusing and that you have to go back and forth from here to there. I suppose I should have included my own tutorial on the binding, but alas, I didn’t take enough pictures of the whole process.
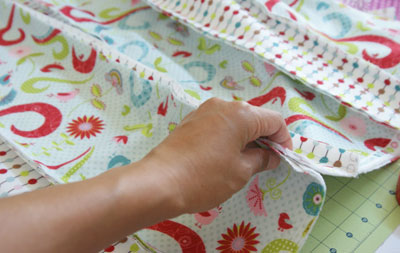
15. When pinning the binding to the blanket, pin it to the BACK side (the tutorial I linked to says pin it to the front side) of the blanket. I found it easier to pin the fabric with the pins pointing in.
16. When pinning the seams, just push them to one side.
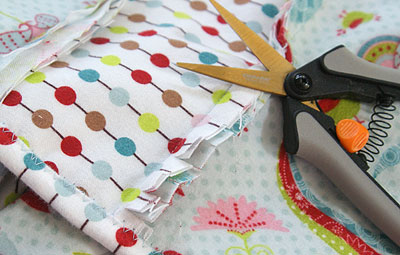
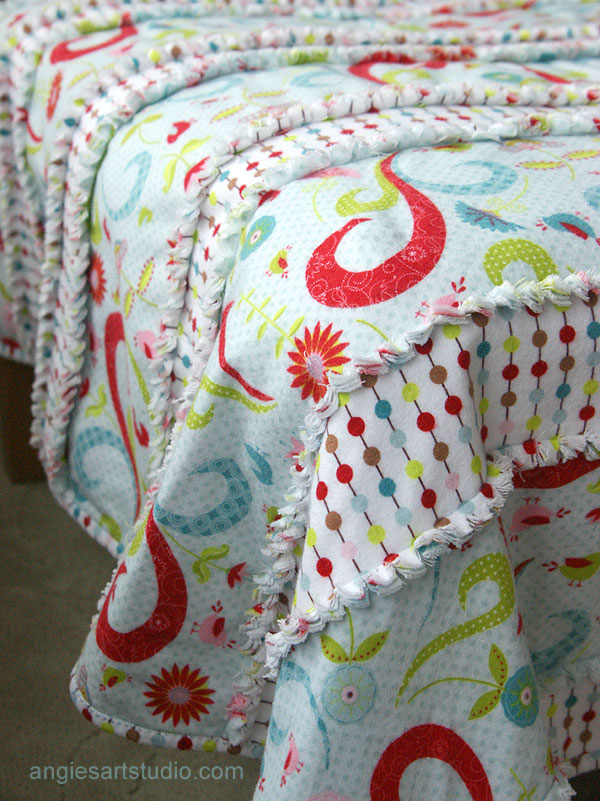
17. After the binding is on, you can snip away. I space the snips about 1/2 inch apart and did it while watching some TV, and yes, I was being careful not to cut into where I had sewn!
18. Before washing my blanket I took it outside to give it a good shake. Be warned, there will be lots of short bits of thread from all the snipping and clipping and there will also be lots that come loose in your washing machine and dryer. Wash the blanket – I washed mine on the cold cycle.
19. After washing I took it outside again to give it another good shake and made quite a pile of short threads! It’s been so hot here lately that I avoided using the dryer for too long, I think I put the blanket in for about 10 minutes and even in that short time there was a large amount of lint and thread that collected in the filter.
That is the part I like the least about the rag blanket, but oh well it’s the nature of the beast, so to speak. I suppose the loveliness of how this blanket turns out far outweighs the annoyance of some loose threads.
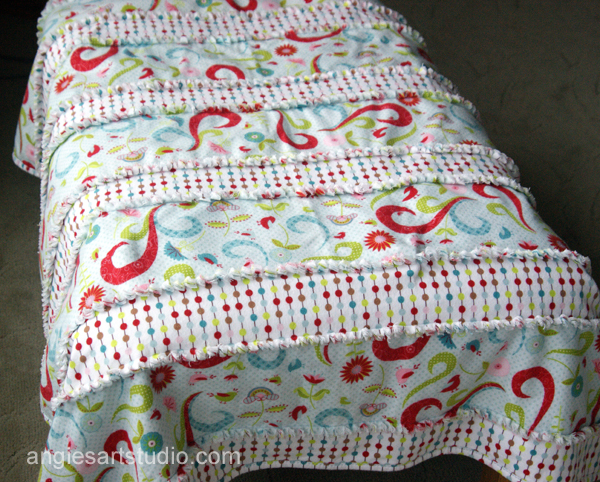
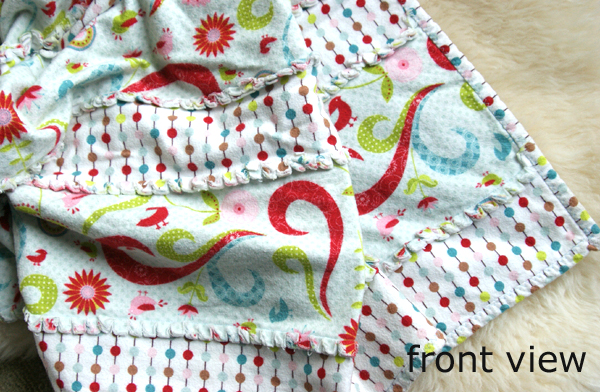
(Note: in the above picture the blanket is covering a coffee table, not a bed. The finished size is about 42″ x 48″)
I would love to hear from you if you have any questions, comments or suggestions – or if you make a rag blanket I would love to see your version of it! You can leave a comment below or you can contact me here.
Happy sewing ^-^
 A Scrappy Patchwork Rug for the Kitchen – Another Easy Sewing Project
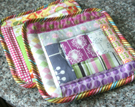 Sewing Tutorial: Log Cabin Potholders Made From Fabric Scraps
 How to Stitch a Triple French Knot
 Curtains Makeover – From Dreary to Cheery


This is wonderful – the strips are less daunting than making a gazillion squares. TY!
As for the edges – if you don’t want the ‘rag’ then this might not be the right project for you.
I would not pre-wash – the idea of a rag is to make the entire, clip the 1/2″ edges, then wash. The fraying is what causes that wonderful rag look.
The difference between using fleece and flannel = fleece does not fray.
Flannel is why the rag quilt is such an amazing blanket.
I bought all the flannel and then never got around to making my rag quilt – so I purchased one at a quilt fair because I liked the colors and it was made by my Secret Pal’s husband! I still love it and use it on my bed.
Have fun!
Again, thank you for this great tutorial.
PS – the one I purchased cost me $125 – or maybe $150 – and is worth every cent!
The instructions seem to be very clear, and after reading thru them a few times I feel confident. I am confused, however, about the attachment of the quilt front to the back. I understand that there is no middle layer, but when is the back created and the front of the quilt attached to it?(and what is the the recommended procedure for doing so?). I feel like I am missing something…….does the process automatically result in the quilt back being created and attached? Thank you!
Love this! Thanks so much for the easy to follow directions!!! Made this morning and is in the washer as I THANK YOU!!! Have a neices baby shower this afternoon and is going to be perfect for my new little great-nephew!! Turned out fabulous!!
Did you make the back of the quilt just like the front and how did you attach front and back
I made one of these and when I washed and dried it it had lint all over it that was hard to remove. Any suggestions on how to avoid this?
I made a rag quilt based on this beautiful quilt but because I couldnt find the material on the bold I used firve difference coordinating fat quaters fabrics. Ugh. I had to design a patchwork quilt instead, but it turned out very nice. Because I was using so many different pieces of fabric, I chose to prewash the fabric first since fabrics don’t always shrink in the same way.
Did you preshrink any of your fabrics ???
what would the measurement be for a Queen sized blanket?
If you chose not to bind the edges of this rag blanket, could you sew together the 2 layers of flannel around the 4 sides of the blanket and snip the edge to make it “rag” and fray?
Yes, I suppose you could.
I made a similar rag quilt and did not bind the edges and it looked just fine. I think the binding gives it a more professional/finished look though.
I have made 5 rag quilts and never bind the edges. Yes, I just sew around the edges and clip those. Oh my granddaughter’s quilt I used minky cloth for the back “smooth” side. It turned out beautiful. The other 4 quilts I used two pieces of the same flannel on both sides. The quilts are always a big hit at the baby showers. They are my go to gifts now for special friends.
Yes, you definitely can. I have made about 6 rag quilts using this method and always leave the edges clipped. Turns out nice and cozy. I will try binding the edges some day. I like that look as well. This is a great tutorial
So, so cute!!! How do you think it would turn out using fleece instead of flannel? Thanks.
You could also use fleece instead of flannel.
I love this quilt! I have made several rag quilts but I have never put a binding on before. Did you sew 3/8″ from the raw edges like the tutorial says or farther in because your binding strips were
cut 3″ instead of 2.5″? Thanks!
I sew 3/8″ from the raw edge.
😱 So Beautiful!! Thank you for sharing!! 😉
would this pattern work with fleece, or does it have to be flannel?
Although I have not made it with fleece I think it could work well.
How do these blankets hold up for the second, third, fourth ect. wash? Do you have to use the same precautions as for the first wash?
Blanket holds up well for the 2nd, 3rd and 4th washes. There doesn’t seem to be as much lint and fraying as the 1st wash.
My niece asked me to make curtains and a quilt/blanket for their baby due in June. I chose this pattern and am just now finishing the binding as per directions on the tutorial you posted. Both are wondertul! Thanks!
So glad to hear it turned out wonderfully for you. Thanks for your comment!
Did you not put batting between your layers?
No, there is no batting between the layers.
Can you make a one sided if so how would that work?
Not sure what you mean by “make a one sided”.
Do you think this would work with fleece in a single layer?
No, the rag blanket needs to have 2 layers or more.
I’m a little confused. What is the back made of? Is it just the other side of what’s shown in the pictures?
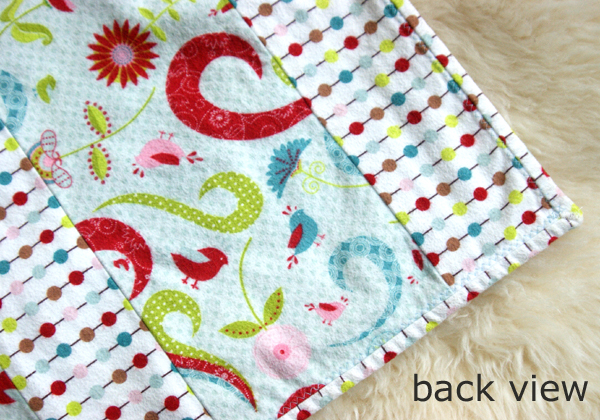
The back is another layer of flannel.
i really appreciate this picture by picture instructions I’ve wanted to make one of these for my grandchildren and even though I sew all the time I was stumped Thank you
On the binding it calls for 5strips of 3″. My question is, on the binding is it only on the sides? Because it looks like the top and bottom of the blanket is frayed.
The binding binds the edges of the blanket. The fraying is on the FRONT side of the blanket.
Are all the materials all flannel and two layers of backing flannel too?
It is all flannel, one layer for the front and one layer for the back. Two layers total.
Love the look of this blanket. I love making baby rag blankets and I will be making this one for my next baby shower. ADDED BONUS: all that dryer lint is great for starting campfires!
This is gorgeous!!! Thank you for the simple tutorial!! Definitely trying this.
I love this blanket! I’m a senior lady just getting back into sewing after at least 30 years. I’m going to make this larger for myself (a little bigger than a throw). It will make a nice naptime blankie for when the grandkids visit. (I’ll need more than one.)
Hi,I love this blanket idea,I think it would make up very fast for christmas gifts for my grandsons.,but I was wondering what the back looks like? is it 2 layers thick.,so flannel on the back too?
yes, two layers of flannel. The back is flannel too. A small picture of the back is seen in the picture where I’ve pinned the binding to the back of the blanket.
TIP: Baste the sides of a sheet closed and put your blanket inside, & baste shut to wash the first time, this will catch the threads. This will make it easier when making larger blankets, and much better for your washer.
Thanks Lorraine! What a great tip! :)
I have made many rag quilts. I love this new version! Thanks so much for sharing!!
You could also make this on the diagonal for yet another look. I made one with the squares for my sisters little boy. He is now six and it has held up very well.
Thank you all for your lovely comments! This blanket is not large enough for a twin bed, finished size is about 42″W x 48″H. Sorry the picture looks misleading, the blanket is actually covering a coffee table.
I loved your quilt. Is it large enough to cover a twin bed?
No. To make it large enough you will need to piece together the strips to make them longer and add more rows.
I would love to make one of these for my daughter. However, she has a full-size bed. Can you tell me how to figure out how much fabric I need for a full size blanket.
I can’t thank you enough for sharing all this info and the step by step tutorial. This will be my first quilt style blanket, and I’m hoping this will be easy to follow.
This is the exact quilt I want to make for my daughter! Just different flannel! Im so excited! I kept seeing all these rag quilts but I didn’t love the look of the squares just like you! I’m so buying fabric soon and doing this!
In the photo, this looks large enough for a twin size mattress…is that true? If so, I’d just like to double check that the fabric bundle on etsy is also large enough for a twin. Thank you!
Wow love this, you have explain it to where I can understand. I just learn how to sew and have seen this but really did not want to do all the square’s. Going to try this, and will send you a pic of how my blanket comes out.
Thanks for sharing!
I love this, thanks for posting. I am going to try this. Hope to post my blanket.