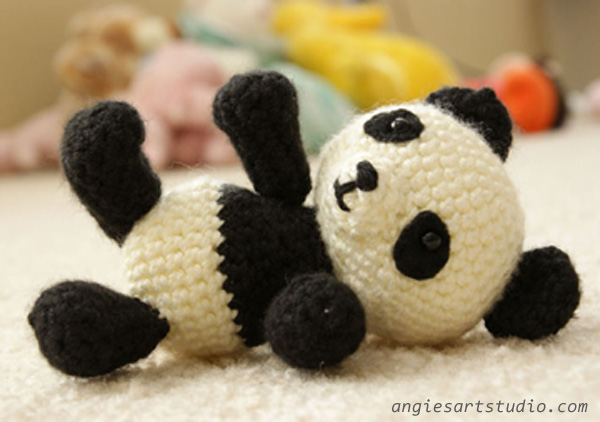
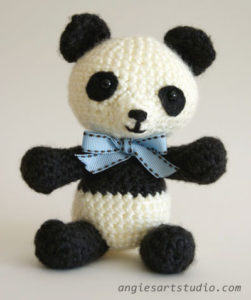
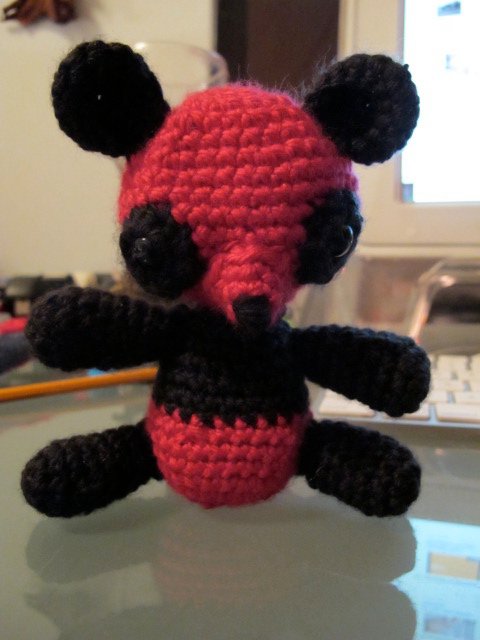
Panda Bear Amigurumi Crochet Pattern – Free!
April 9th, 2010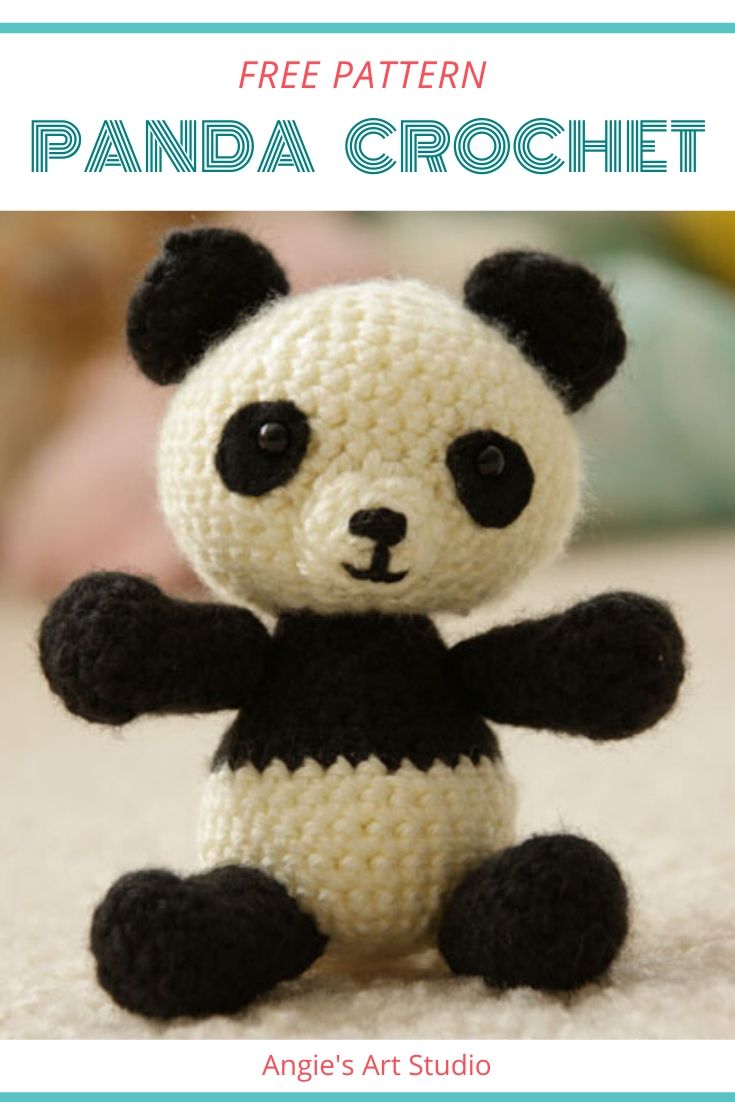
This amigurumi pattern designed by me gives instructions on how to crochet Pablo the Playful Panda. It is very easy to crochet and only requires knowledge of 3 crochet stitches – single crochet, increase and decrease. Pablo means small and humble in Spanish and his finished size is about 5″ (12 cm) high. He is certainly small and humble like his name suggests, but he is oh so playful!
{This pattern is under international copyright laws. Please do not copy, redistribute or sell. The written instructions and photographs in this pattern are intended for personal and noncommercial use and permission is granted to print the pattern for such use. If you wish to sell the items made from this pattern, please contact me first.}
Here is the material list:
- Crochet Hook: Size G6 / 4mm (I use these crochet hooks that have an ergonomic soft handle)
- Yarn: any Worsted Weight 4 ply yarn is fine.
- Colors: Off White and Black
- Craft Eyes: 6mm Solid Black Plastic Craft Eyes with safety backing (available here)
- Craft Felt : Black, 2 small patches
- Needle and black thread: for sewing on felt patches
- Yarn or Tapestry Needle: for sewing parts together
- Pins: for holding parts together while you sew
- Poly-fil: polyester fiberfill for stuffing
- Scissors
SC = Single Crochet
ST= Stitch
INC = Increase
DEC = Decrease
To change color of the yarn, begin the single crochet with the first color. This should leave you with two loops on your hook. Now grab the second color with the hook and pull it through both loops to complete the stitch. Now continue the next single crochet in the second color.
MUZZLE
Off White yarn. Start with Chain 2.
R1: 5 SC in second chain from hook (5)
R2: SC 3, INC 2 (7)
R3: INC 1, SC 3, INC 3 (11)
R4: SC 2 (2) Yes, that’s right, this row only has 2 stitches and should finish off at the top of the muzzle. Fasten off leaving a 10 inch (25 cm) tail for sewing on to head.
Because the muzzle is so small, instead of stuffing with poly-fil, I use left over bits of off white yarn. Sew on nose and mouth with black yarn.
HEAD
Off White yarn. Start with Chain 2
R1: 6 SC in second chain from hook (6)
R2: INC 1 in each ST (12)
R3: * SC 1, INC 1 * repeat 6 times (18)
R4: * SC 2, INC 1 * repeat 6 times (24)
R5: * SC 2, INC 1 * repeat 8 times (32)
R6: SC in each ST (32)
R7: * SC 3, INC 1 * repeat 8 times (40)
R8: SC in each ST (40)
R9: as above (40)
R10: as above (40)
R11: as above (40)
R12: * SC 3, DEC 1 * repeat 8 times (32)
R13: SC in each ST (32)
R14: * SC 2, DEC 1 * repeat 8 times (24)
Insert eyes through the patches of felt by cutting a tiny slit in the felt. Place into position on the head and sew patches onto the head. Fasten on the safety backings.
R15: * SC 1, DEC 1 * repeat 8 times (16)
R16: * SC 2, DEC 1 * repeat 4 times (12)
R17: SC in each ST (12) Fasten off and stuff with poly:fil.
EARS (make 2)
Black yarn. Start with chain 2
R1: 6 SC in second chain from hook (6)
R2: INC 1 in each ST (12)
R3: SC in each ST (12)
R4: as above (12) Fasten off, leave a 6 inch (15 cm) tail for sewing onto head, flatten the ears so that they are in the shape of a half circle and two layers thick, no need to stuff with poly-fil.
{You will be able to see what I mean in this picture here.}
BODY
Off White yarn. Start with Chain 2.
R1: 5 SC in second chain from hook (5)
R2: INC 1 in each ST (10)
R3: * SC 1, INC 1 * repeat 5 times (15)
R4: INC 1 in each ST (30)
R5: SC in each ST (30)
R6: as above (30)
R7: as above (30)
R8: as above (30)
R9: * SC 4, DEC 1 * repeat 5 times (25)
Change to black yarn
R10: SC in each ST (25)
R11: as above (25)
R12: * SC 3, DEC 1 * repeat 5 times (20)
R13: SC in each ST (20)
R14: *SC 2, DEC 1 * repeat 5 times (15)
R15: SC in each ST (15)
R16: as above (15) Fasten off, leaving a 10 inch (25 cm) tail for sewing onto head, stuff with poly-fil.
ARMS (make 2)
Black yarn. Start with Chain 2.
R1: 6 SC in second chain from hook (6)
R2: INC 1 in each ST (12)
R3: SC in each ST (12)
R4: * SC 2, DEC 1 * repeat 3 times (9)
R5: SC in each SC (9)
R6 to R9: as above (9) Fasten off, leaving a 9 inch (20 cm) tail for sewing onto body, stuff with poly-fil.
LEGS (make 2)
Black yarn. Start with Chain 2.
R1: 6 SC in second chain from hook
R2: INC 1 in each ST (12)
R3: SC in each ST (12)
R4: SC 3, DEC 1, SC 1, DE1, SC 4 (10)
R5: SC in each ST (10)
R6 to R8: as above (10) Fasten off, leaving a 9 inch (20 cm) tail for sewing onto body, stuff with poly-fil.
TAIL
Black yarn. Start with Chain 2.
R1: 4 SC in second chain from hook. (4)
R2: INC 1 in each ST (8)
R3: SC in each ST (8) Fasten off leaving a 6 inch (15 cm ) tail for sewing onto the back of the body. No need to stuff with poly-fil.
Pin the parts in place and sew together with a yarn needle.
You can decorate him by tying a bow around his neck.
If you make this pattern and have pictures to share I would love to hear from you – comment below or share it on my Facebook page – you will of course have to like me first :)
Thanks for your interest in this pattern and I hope you have fun making Pablo the Playful Panda!
Interested in crocheting more cute animals?
This is a book I have used a lot for crocheting other cute animals: “The Big Book of Little Amigurumi” has 72 patterns that are easy to crochet.
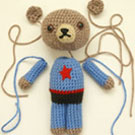 The Deconstruction of Super Bear
 A Crochet Project in Progress: Starburst Granny Square Blanket
 How to Stitch a Triple French Knot
 Our Weekend of Making Duck Tape Flowers


Hello..thank you so much for your pattern it was easy and fast and fun to make😀
Very fun pattern. I changed the starting ch’s and used the magic circle to start. and I modified the ears as well an made them flat instead of folded over. I also sewed on the limbs before stuffing . came out great. so cute.
I love your pattern , thank you so much for sharing. Can you please explain to me how I can make it a little bigger. Thank you.
HI Alice – to increase any amigurumi pattern you can use thicker yarn (can use a double strand) and a bigger hook. To make it smaller, use thinner yarn and smaller hook. Hope this helps you.
All you need to do to make a project bigger is use a larger hook. But I wouldn’t go any larger than an I hook ,without changing the yarn as well. usually this is when it starts to get into higher ply yarn ( thicker) or holding 2 pieces at once.
Also too much bigger would probably need a change in pattern because you would need quite a few more rows of sc in each all the way around n some of the other rows may be doubled . So basically, I would think larger than an I hook ,you may need a revised pattern.
However, I am not the creator of the pattern ,just seen your question trying to help.😊
Omgiatsh,,,😳
Just realized this is over a year old so sorry.lol
I’m late for everything .
Probably be late to my own funeral .
Well ,maybe my comment will help someone else. Hopefully, and I agree, thank you for the pattern ,it’s very well written and easy to work up .
Be Blessed have a great weekend
Mrs. Queen Victoria 👑
You could use two strands of yarn at once and a bigger hook to make him bigger, but the finished product will be much stiffer because of how thick it is
I made this Panda with black and white cotton yarn for my friend. She loves Panda’s. I also crochet a tiny hat and scarf for it. To bad I don’t have a photo! Thank you for having this pattern free!
I am in the process of stuffing and sewing all the parts. This was super easy and fun to make.
Really cute little panda, may try it, like the black and white but
problem working w dark colours. Doing little items including tiny
dog for a Christmas game rt now, + baby snuggly blankets
Hi…I too have trouble using dark yarn…Someone suggested putting something like a white towel or white pillowcase across my lap when I’m using dark yarn and the contrast really helped me see the dark yarn much better when I’m crocheting
This is so cute and adorable. Thanjs for sharing. This is my first amigurumi project. I needed this panda pattern very badly.
Hi, in your round 3 of ears, you say “as above” but in round 2 you say “INC in each stitch.” Following these instructions would result in 24 stitches in round 3. I believe this is the trouble the person above was having.
This pattern is very awesome besides that. I really enjoyed making it. I used black and white cotton yarn. He turned out really cute. Thank you for giving this pattern away for free!!!
I mean the person below, sorry
Thank you very much this adorable pattern!
I maded it in this week for me. :-)
Here is the photo: http://fotosblog2013.blogspot.hu/2016/02/februar-13.html
Have a nice day: Eva
You’re welcome Eva and your panda turned out really cute!
Very cute one . Thanks for sharing .
i just love it ! thanks for the pattern !
very beautiful panda
Thank you for the detailed description
You saved my Christmas by offering this Panda pattern for free. I’m making it for my daughter who loves pandas. You pattern is one of the best i have seen. Thank you.
Dear Angie, thank you for the pattern! My doubt – are the rounds worked continuously or by joining (sl st)?
the rounds are continuous, do not join with a slip stitch.
I have just started making the little animals, and your panda is so adorable I can’t wait to make it, so far I’ve made a unicorn for my Neice and just finished hello kitty for my daughter, thank you so much for the pattern
what difference will it be if I used a 3.5mm hook instead of a 4?
Stitches will just be a little tighter. I don’t think there will be much of a difference.
Angie, thanks. Love pandas. I have about 20 great grandchildren to make a pandas for.
Thanks a lot for this lovely pattern; look at the panda I made here : http://get-free-crochet-patterns.blogspot.in/2013/10/amigurumi-panda.html
you’re actually a excellent webmaster. The web site loading velocity is amazing. It seems that you’re doing any distinctive
trick. Furthermore, The contents are masterwork. you’ve performed a magnificent job in this topic!
Each kids and adults who snore habitually is going to
be building up future damage of unwanted wellness hazards to their wellness as serious oxygen
depletion leads to lack of concentration, high blood
pressure along with other severe well being issues. But when it truly
is especially a youngster that has a nightly snoring issue, you can find the immediate dangers of
a mimicked ADHD problem through the day hours.
THANK YOU FOR THE PANDA BEAR PATTERN I NEEDED IT FOR MY DAUGHTER SHE IS HAVING A BABY AND THE THEME FOR THE BABY’S ROOM IS PANDAS SINCERELY DARLENE
I’m fairly new to crochet so I do not understand these instructions at all! They are so confusing.
Awesome.
Thank you so much for sharing this pattern so generously…Was cracking my head what to give a friend who loves Panda…I got to revise my crochet skills again.. :p
Your pattern is adorable. But I am having trouble with the ears. Is there a correction?
Thanks!
Thanks Connie! I’m really glad to hear that and I love the play on words! I hope P AND A will enjoy their amigurumi pandas.
Thanks so much for the pattern. Most amiguri pandas are a little scary looking, but yours is delightful. I am making them for my TTTS twin grand-nieces who are 1 yr. old. Payton AND Addison. (P AND A)!
Hi.. I’m just starting with crochet, hoping you can send me this pattern.
Thank you so much for the awesome and free pattern!! I was able to make a great gift for my nephew with it! I have a pic of it, but don’t know how to post it :-( Anyway, thanks again!
I think the bear is so cute I can hardly wait to make him.
i love this pattern it was quick and easy to follow. i made one for my friend because she loves pandas. It came out great and she loves it.
Hi! I am very very new to crocheting and I have only seen “inc 1” in instructions. What does “inc 2” mean? Is it much different from “inc 1”? Thanks!
inc stands for increase, which means crochet 2 stitches in the one stitch. Here is a video to show you how: http://www.youtube.com/watch?v=aMgw6omIA1c
“inc 2” means to increase the next 2 stitches. Hope that makes sense!
I make a panda bear amigurumi. You can see it in my blog
le-brico-d-anne.over-blog.fr.
Thanks for your free pattern.
Hi, i totally loved yr pattern…. and want to try it out… however i am very very new to crochet and am learning and just picking up stuff… is there a way/pictures wherein i can see and follow how to make this… maybe like a tutorial… because since i am new there are lots of terms that i misunderstand… thanks for the help!!!
Hi Shalini! Thanks for your message! You can try this Youtube tutorial, I found it helpful when starting out myself. It takes a while to get used to the terms in the written pattern, but you will get the hang of it the more you do it. Hope this helps and let me know if there is anything in particular about the pattern that you don’t understand.
I’d love the pattern!! He’s so super cute!! I’ve just finished my first crochet amigurumi (bunny) and he could be next!
You’re welcome. I enjoyed making him, and am now making a pink one. Totally love the pattern. Thanks for posting it. :)
I love your pattern and used it to make my first ever crochet toy – a blue and white panda with a tuft of blue and white hair. I can send you a photo if you’d like. :)
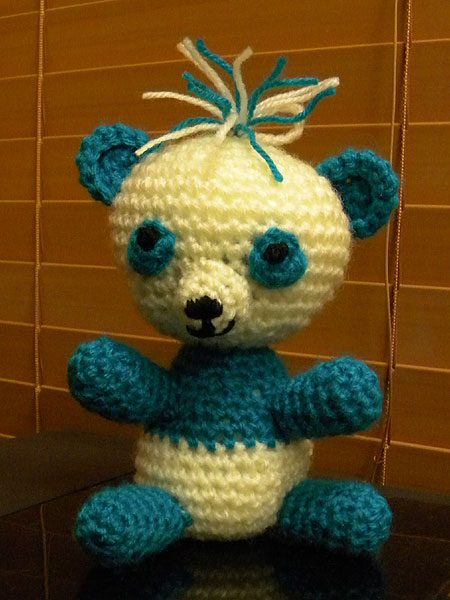
Wendy, Your Blue Panda is soooo very cute – love the tuft of hair! Thanks for sending a picture of it!
did you use the instructions for the ears or make up your own ? very nice.
Adorable. I would love to have the pattern or a panda bear about a foot high. Any ideas on where to find one. Sallie
Thank you so much for sharing this adorable pattern. I love pandas, so I just had to make it. I am relatively new to crochet, so this was my first non-scarf project. It turned out wonderfully. I’m going to send you a picture!
You’re welcome Sandy! Glad to hear that you like how your Panda turned out, I look forward to seeing the picture!
Hi,
I was interested in this design but was curious as to what the * signify in the instructions. Could anyone let me know what they mean?
Thank you very much,
Nick.
The * symbol means to repeat what is between the *’s the number of times stated.
Thanks for the pattern! I used your pattern to make my first ever amigurumi. It turned out great. It’s pink and black. I can send you a pic if you like. Thanks again! Marisa
 .
.
Thanks for the pic Marisa! I love your pink and black Panda – pretty good for your first amigurumi!
Thanks a lot! Needed to crochet a pattern for a panda-lover friend :)
This is adorable!! Thank you so much for being willing to share. I’m using it as my very first amigurumi crochet project and it is coming along nicely (: